Generative Art Algorithms: How to Build an NFT Collection
By ringaile.eth, edits lonilush and Juliette Chevalier
If you’ve ever explored an NFT collection, you’ve probably wondered how teams draw thousands of unique pictures with different rarity levels.
Here’s the secret: no one does this manually!
We use generative art algorithms to create NFT collections and generate the image metadata linked to the collection’s smart contracts.
Want to know what is a generative art algorithm? Want to build one yourself?
We got you covered!
The first part of this article explains what a generative art algorithm is and what are its basic components. In the second part, we go through a step-by-step guide to building a generative art algorithm using the Surge Passport NFT collection as an example.
TL;DR
Most generative art algorithms follow these steps:
The artist draws the layers for each attribute.
The artist and the developer decide the order of the layers.
We calculate the rarity for a single item in each layer within the collection.
We set up the rules (and we’re fully prepared to change them!).
We generate the images with their corresponding metadata based on file names.
We add the metadata to the NFT smart contract.
What Is a Generative Art Algorithm?
Let’s imagine you want to build a collection of thousands of NFTs. All NFTs in the collection need to share features and look cohesive, but… they also need to be individually unique.
Now imagine trying to manually draw 10k images while keeping track of all the features and rules. Not impossible, but definitely difficult… And, most importantly, not necessary!
This process can be fully automated through a generative art algorithm.
A generative art algorithm is a tool that enables artists and engineers to automate the process of art creation, often used to craft large NFT collections.

The components of a generative art algorithm
In the case of the Surge Passport NFT, we wanted to create a PFP (proof-of-picture) collection composed of 5.000 portraits of diverse, empowered, surging women around the world. Kiri, our artist, made the first sketches and characters. Then, we got to work on additional drawings and building the algorithm.
For this algorithm to work, several components have to come together.
Layers
Each component of the final image is a unique layer. So, we would have a layer for the general body shape, then layers for eyes, ears, hair, eyebrows, lips, etc. With these layers, we’d get the basic appearance of our Surge PFP.
Then, we can layer other traits, such as clothing, jewelry, glasses, head ornaments, etc. The possibilities are endless.
It’s super important to define each layer in advance. Another very important thing to determine is the order in which we stack the layers.
Traits
No two faces are the same, which means the more traits we define, the more variation and uniqueness we’ll achieve in our collection. Some traits go well with each other - some don’t. These are the kind of things we need to define within the rules.
Let’s take the eyes layer, for example. We want to have blue, green, gray, brown, black, purple… eyes in our collection. These variations upon facial features are usually referred to as traits. You can keep it simple and go through variations for each facial feature, or your traits can be related to clothing, accessories, and rarity.
Weights
Some traits are very common, while some are rarer. The percentage at which traits appear in a collection is defined by “weighing” the trait.
For example, if we want brown eyes to be the most common, then this trait would have the highest weight, while pearl-purple-metallic eyes would have the lowest. We cover more info on weighing traits below.
Rules
Layers, traits, and their weights all need to come together to form an image through the rules. These rules are what essentially defines our generative art algorithm.
Some rules relate to matching the right colors and backgrounds, some are technical, and some are based on the style and intention behind the collection.
Step-by-Step: How to Build Your Own Generative Art Algorithm
Now that we know the generative art algorithm components, we can see how they come together to form a collection.
1. The order of the layers
Before writing the code, we need to prepare the layers of the NFTs. It takes a lot of talent to plan out all the layers so that a particular trait would look in place with all the other layers. They all need to match perfectly, without looking like they’re out of place or positioned randomly.
Once we have all the layers and traits ready, we plan the order of the layers. We stack the layers from background to base body shape to the smallest details like earrings or face jewelry.
This order should not be changed as we add or modify existing traits. For example, this is how we ordered our layers:
layersOrder: [
{ name: 'Background' },
{ name: 'BackHair' },
{ name: 'Base' },
{ name: 'Tattoos' },
{ name: 'Mouth' },
{ name: 'Nose' },
{ name: 'Blush' },
{ name: 'Clothing' },
{ name: 'Earrings' },
{ name: 'Eyes' },
{ name: 'JewelryFace' },
{ name: 'JewelryFace' },
{ name: 'Eyebrows' },
{ name: 'JewelryNeck' },
{ name: 'JewelryNeck' },
{ name: 'FrontHair' },
{ name: 'JewelryForehead' },
{ name: 'RareSurge' },
]
We started from a Background layer, which was the first layer the algorithm picks up to start crafting an NFT. Then we have a BackHair layer which is drawn on top of the Background, then the Base layer on top, and so on.
Also, some of the layers are duplicated because some of the traits appeared twice in the NFTs. For example, some of them could have two layers of JewelryFace (because a woman can never have too many accessories, right? 😛), so if a layer can appear twice in the NFT, they should be treated as different layers and be mentioned twice in the list.
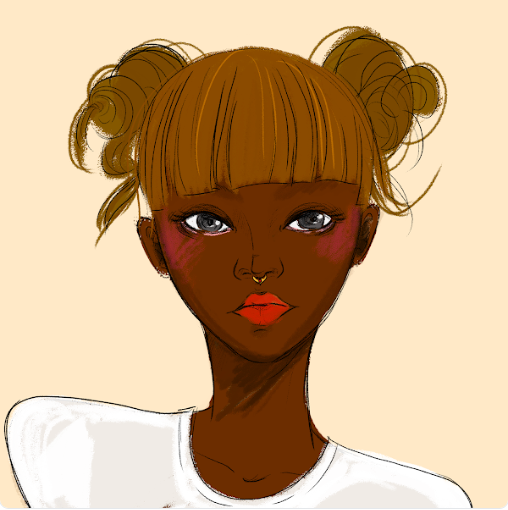
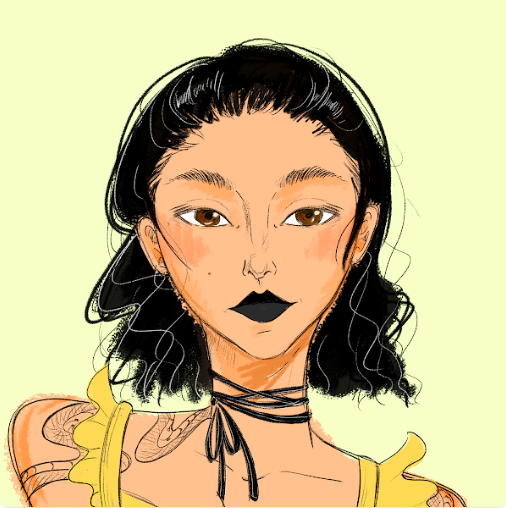
Once we stacked all the layers in the right way, we got images as beautiful as these:
2. Defining the traits
Another critical step before we start coding the algorithm is making sure we’re describing each trait well. Naming the traits in a way that makes sense helps enormously with writing the rules.
For example, our files were named using this template:
clothing---ruffle-turtleneck-yellow-#1.png
The first part of the file name, “clothing”, indicates the name of the layer,
The second, “ruffle-turtleneck-yellow”, describes the trait,
and the last piece, “#1” shows the weight of a trait.
Now, after traits are ready, named, and ordered, we can move into rarity.
3. The rarity
If we want all of our traits to be represented equally, we can simply skip this part.
However, usually, we want to customize our collection based on the vision of the artist and the team, so we tend to want to add some weights to certain traits.
We spent a lot of time on this because we wanted to create a very inclusive collection that accurately represents women around the world.
In order to see how it’s done, let’s imagine the following scenario: we have four different colors of hair and several hairstyles for each color:

Once the weights have been set, we set up the algorithm to sum up all the values for a given attribute list and randomly pick which specific trait to go for:
   const totalWeight = 0;
      layer.elements.forEach((element) => {
        totalWeight += element.weight;
      });

      let random = Math.floor(Math.random() * totalWeight);
      for (const i = 0; i < layer.elements.length; i++) {
        random -= layer.elements[i].weight;
        if (random < 0) {
          return randItem.push(
            `${layer.elements[i].id}:${layer.elements[i].filename}`
          );
        }
      }
As a reference, this algorithm was taken originally from ProsePoetryCode and can be found here.
In that case, a single blonde hairstyle would have a 5 out of 200 chance to be selected, instead of 2.5 out of 100.
👀HACK : decimal numbers often represent one of the biggest complexities when setting up rarity in collections. These are often crucial to getting the right amount of rarity in traits, but because we already have two different delimiters in the file name (“-” for parsing the description and “#” for parsing the weight), adding an additional “.” generates often unnecessary complexity. Going with weights simplifies this and allows us to keep working solely with non-decimal values.
4. The rules
Once the weighting is done, we are ready to implement the rules.
It is important to know that the rules most likely will change as we test sample sets of the collection. The real power of this algorithm is that it always keeps surprising you with combinations you never could have imagined. For good or bad, as we run the algorithm, we’ll notice that some colors don’t go well together, or that some traits appear mismatched by a couple of pixels.
Nevertheless, rules are the most important part of the algorithm - they’re what makes a collection look cohesive, distinct, and fun.
What excited us the most about building these rules is that even if writing code is a technical endeavor, it can often feel like a very non-technical task. To build a set of rules that will ultimately lead to a great collection, you need to understand the community, be clear about the team’s vision, study diversity and representation, and finally, have a sense of style.
To give you a sense of what these rules look like, let’s say we don’t want our yellow-turtleneck always combined with jewelry-face—glasses. We would need to write something like this:
return attributes.some(e =>
e.includes("clothing---ruffle-turtleneck-yellow")) &&
attributes.some(e => e.includes("jewelry-face---glasses");
This statement is checking if the randomly generated attribute list contains turtleneck-yellow and jewelry-face—-glasses, and if it does, return true. Otherwise, if one of these traits is not there, it should return false and we do not generate a new image. We run through this cycle until we generate only images that fit all of our conditions.
Although it may seem like the rule is done here, we may still have some traits that have none of these values. In such cases, the rule should only be applied when a trait appears. For example, this function then becomes:
return attributes.some(e =>
e.includes("clothing---ruffle-turtleneck-yellow")) ? attributes.some(e
=> e.includes("jewelry-face---glasses") : true;
We first check if a trait exists in the image, then check if the combination exists. Otherwise, ignore it (which is what the return true exemplifies at the end of the ternary).
We can also combine the rules. There’s often no need to include every single file name in our rules. For example, instead of yellow-turtleneck, we want to combine all turtlenecks with glasses. In that case, we can write it as follows:
return attributes.some(e =>
e.includes("clothing") && e.includes("turtleneck")) && attributes.some(e =>
e.includes("jewelry-face---glasses");
With this, we check if the attribute has both words clothing and turtleneck and if so, we apply the rule. Otherwise, if the attribute has clothing but it is a different kind, the rule is ignored.
6. Generating the images
Once all rules are set, we can now proceed to implement all the customized rules and generate our collection.
However, as you generate more and more sample collections, you’ll notice that some combinations don’t work well. That means we still need to redefine the rules. Don’t be afraid to run the algorithm as many times as you need to keep changing the rules. The more iterations you do, the closer you get to your dream collection.

7. The metadata
Aside from generating the images, our generative art algorithm also generates the metadata for each of these images.
An example of what Surge PFP metadata looks like:
{
  "item": "e89931b7aa0422594a6876f9bd77450cdb6353ec",
  "name": 4032,
  "description": "Each Surge woman is of two worlds: pixel and pen. Each feature, though hand-sketched, has been layered algorithmically to form a whole. The Surge Passport collection represents our belief that beautiful things have a human touch.",
  "image": "ipfs://Qmaseu2BbetLjA6eU7mQ2THEkjdBum5wq1EfuLAY2AoiEA/4032.png",
  "date": 1651121179036,
  "attributes": [
    {
      "trait_type": "Background",
      "value": "Pale Blue"
    },
    {
      "trait_type": "Back Hair",
      "value": "High Pigtails Blonde"
    },
    {
      "trait_type": "Base",
      "value": "Round Bisque"
    },
    {
      "trait_type": "Mouth",
      "value": "Medium Smile Gloss"
    },
    {
      "trait_type": "Nose",
      "value": "Thin Soft"
    },
    {
      "trait_type": "Blush",
      "value": "Freckles No Flush"
    },
    {
      "trait_type": "Clothing",
      "value": "Ruffle Turtleneck Brown"
    },
    {
      "trait_type": "Earrings",
      "value": "Candelabra Silver"
    },
    {
      "trait_type": "Eyes",
      "value": "Blossom Pink"
    },
    {
      "trait_type": "Eyebrows",
      "value": "Angled Blonde"
    },
    {
      "trait_type": "Front Hair",
      "value": "Pushed Back Blonde"
    }
  ]
}
We then store in an IPFS folder all the metadata from each of the NFTs. This generates an IPFS hash, which is what we then pass into the smart contract so that each NFT ID is paired with the right image after mint.
Our contracts had a function that passes the baseURI and establishes where all metadata lives for each of the NFTs. It essentially links the IPFS hash with the contract as this is a variable expected from ERC721.
// @notice Set metadata baseURI
// @param _baseTokenURI New base URI where the metadata lives
function setBaseURI(string memory _baseTokenURI) public onlyOwner {
  _baseURI = _baseTokenURI;
}
In conclusion
A generative art algorithm is a very powerful tool that helps us generate thousands of images and build an NFT collection that reflects our vision and style.
Coding the algorithm is certainly a technical task, but the whole process relies on many more factors. That’s why it’s crucial to have a clear vision and a dedicated team of artists, developers, wordsmiths, and testers.
Also… Don’t forget to have fun!
If you decide to build a generative art algorithm yourself, don’t hesitate to get in touch with the Surge team in our Discord or on Twitter. We’re always happy to help.
Additional resources
https://github.com/HashLips/hashlips_art_engine